

The Sunday evening before last, a few of us hosted a dinner for a girlfriend who is expecting. She and her husband already have two adorable daughters (whom Hudson is wild about) and so she specifically asked for an un-shower-like celebration. I thought it might help to keep the centerpiece green, as opposed to setting out flowers. Pretty, but not precious.
The thing is, I’m kind of terrible when it comes to arranging flowers, so it was really just an excuse to go out and buy a garland! I went to the local florist and showed them some pictures. They could do something nice using green filler, but the cost was going to be pretty high owing to labor. Luckily, the young woman I talked to assured me I could do it myself and gave me a quick tutorial and sold me some some paddle wire. Here’s what I learned:


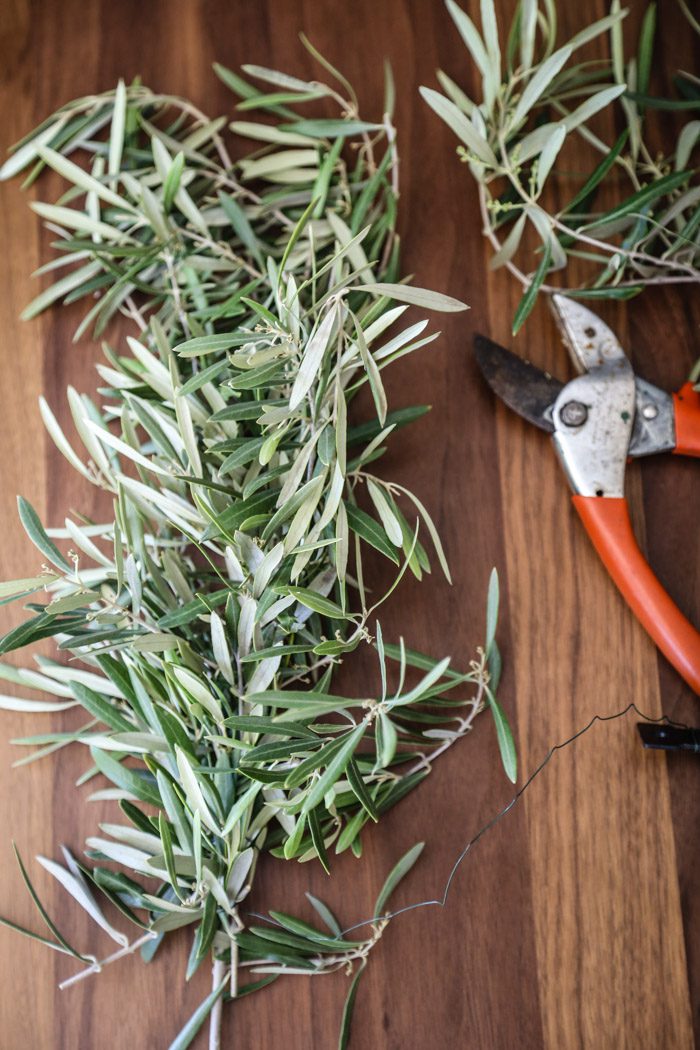
You can use any greenery, really, but I chose olive branches. I like their associations with peace (and food); they look full when bunched together (less room for showing error); and we have a mature tree in our backyard that could stand a pruning. Eucalyptus would have looked really lovely, too. And you can stick flower stems throughout, too, if you’re up to it.
You will probably need a bouquet-sized bunch of greenery for every foot of garland you’d like to make. I had initially thought of a 12-foot garland for an 8-foot table, but then realized we would be seating people at both ends so, in the end, I only had to assemble more like five feet. Wouldn’t it be pretty to make something that spilled off the table?

The idea is that you want to lay branches atop one another to the fullness you desire and wrap wire around the overlain stems. Here is where it is about ten times easier if you are using something called “Paddle Wire
Lay one branch atop another, wrap, repeat. Keep adding branches to get the fullness (width) you desire and wrap as you go. You can go back with your pruning shears later and trim any errant stems, so you don’t even have to worry too much about the shape being perfect.
This is the view of the underside:

I’m sure it could look neater, but no one will see that part. From the top, the wires are invisible. I thought it was surprisingly simple!

I made this the morning-of, but it sat in the backyard looking fresh as can be for four or five days. If you’re wondering how far in advance you could do this, you might see if you can find a branch of whatever greenery you’re planning to use and leave it out ahead of time to get a sense. We have an unruly (but beautiful) potato vine that’s covered in flowers that I bet would look pretty—but I’d also guess that its would wilt a lot faster than the olive tree’s.
Bonus: Some of the leftover stems got used to dress up some ranunculus! (I love the Trader-Joe’s-ranunculus-season.)

P.S. Here’s a photo from the evening, on Instagram. Also: the beautiful baby shower my friends threw earlier this year.


26 Comments